Inventory forecasting sounds complicated. It's not. With the right tool, you can go from "I have no idea when to reorder" to "I know exactly what needs restocking and how much" in less than five minutes. If you're new to inventory forecasting, check out our guide to the 5 essential numbers you need to track.
This guide walks you through setting up Sensible Forecasting on your Shopify store — no spreadsheets, no formulas, no guesswork.
Step 1: Install the App
Head to the Shopify App Store and install Sensible Forecasting. The app offers a 30-day free trial, so you can test it with your actual store data before committing.
Once installed, you'll find the app under the Apps section in your Shopify admin sidebar.
Step 2: Configure Your Default Settings
Before diving into the product data, take a minute to set up your default forecasting settings. These apply to all products by default, though you can customize them per product later.
Sales Period
This determines how many days of sales history the app analyzes to generate its forecasts. You have five options: 14 days, 30 days, 60 days, 90 days, or 90 days weighted average. For a deeper guide on choosing the right sales period, check out our dedicated post.
The 90-day weighted average is the default and works well for most stores. It looks at 90 days of data but gives more weight to recent sales, so it naturally adjusts if a product is trending up or down. If your products are highly seasonal or your sales are volatile, try a shorter period like 30 days.
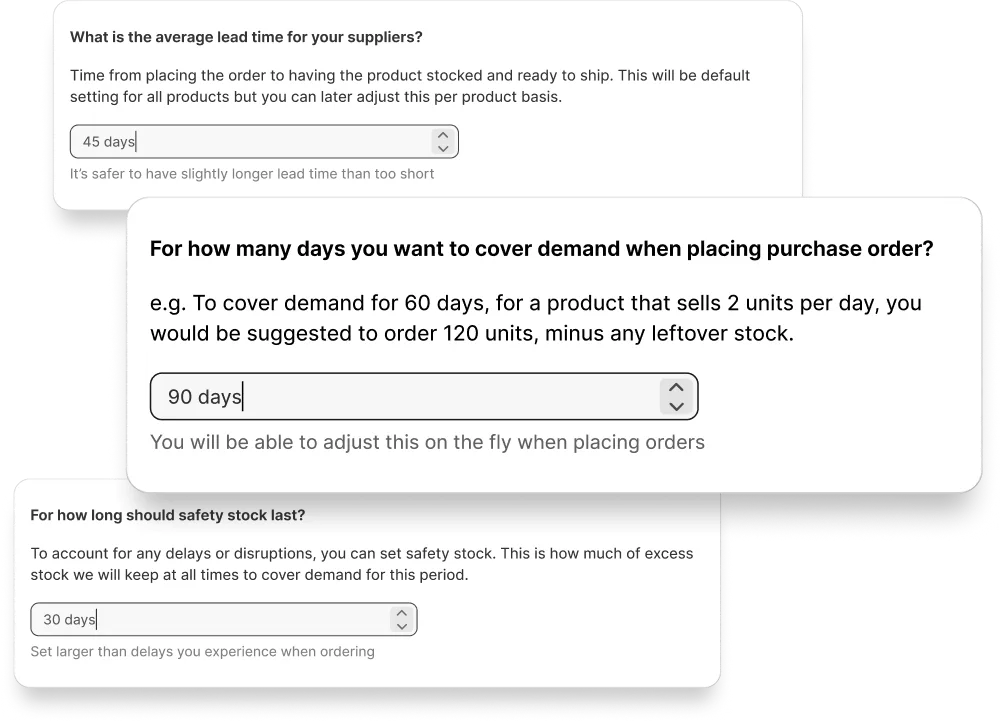
Lead Time
Lead time is how long it takes from placing an order with your supplier to having the product stocked and ready to ship. This is critical for accurate forecasting — it tells the app how far in advance you need to reorder.
Set this to your average supplier lead time. If different products come from different suppliers with different lead times, don't worry — you can customize this per product later. It's always better to set the lead time slightly longer than too short to make sure you don't run out of stock. Our guide on calculating lead time covers this in detail.
Days of Stock
This is how many days of demand you want to cover when placing a purchase order. For example, if a product sells 2 units per day and you set days of stock to 30, the app will suggest ordering 60 units (minus any leftover stock).
Safety Stock
Safety stock is your buffer against supplier delays and unexpected demand spikes. It's the extra stock you keep on hand beyond what the forecast says you need. Set this to roughly the average delay you tend to experience with your suppliers — if orders are typically a week late, set safety stock to 7 days.
Step 3: Review Your Products Table

Open the forecasting app and go to the Products section. You'll immediately see all your product variants sorted by urgency — products that need reordering soonest appear at the top.
Each row shows you the key information at a glance: current stock level, sales rate, estimated days of stock remaining, and the recommended reorder date. Products are color-coded so you can instantly see what's urgent.
If a product is already out of stock, it'll be flagged at the very top of the list so you can act on it immediately.
Step 4: Dive into a Product's Detail View
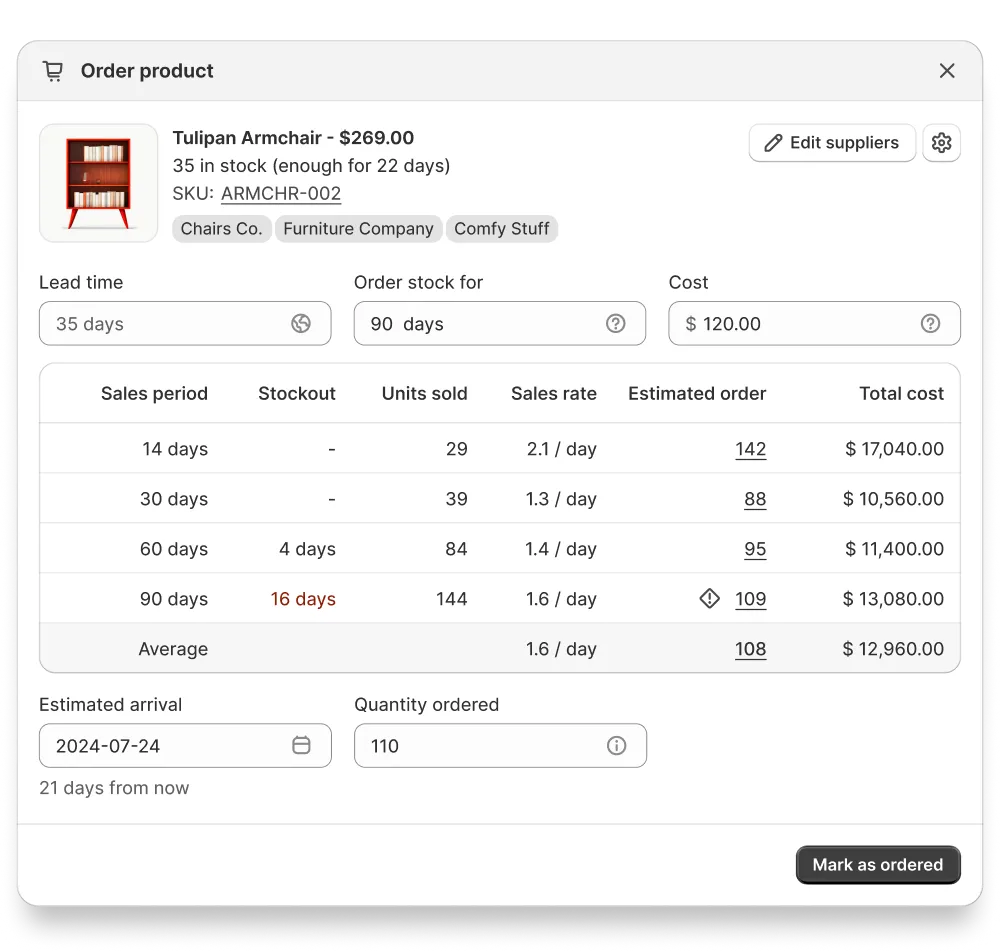
Click the cart icon on any product to open its detailed view. This is where the real insights live.
You'll see how the product has been selling across different time periods. For instance, you might see that a product sold 4 units in the last 90 days, but 2 of those were in the last 30 days alone — meaning demand is picking up. The sales rate for each period helps you spot trends like this.
The average value at the bottom offers a balanced estimate regardless of whether the product is trending up or down, which is a solid starting point for your reorder quantity.
From the detail view, you can also:
- Add multiple suppliers — Shopify only allows one vendor per product, but Sensible Forecasting lets you add alternates so you can compare options and filter by supplier
- Customize lead time — Override the default for products with longer or shorter supplier turnaround
- Adjust the reorder quantity — Use the forecast as a starting point and tweak as needed
Step 5: Place Your First Order
Once you've decided what to reorder, you have a few workflow options:
Order Individual Products
From the detail view, set your order quantity and mark the product as ordered. This moves it to the Ordered tab so you can focus your attention on products that still need action.
Bulk Order by Supplier
If you're placing a larger purchase order with a single supplier, click the vendor tag on any product to filter all products from that supplier. Then use the bulk edit feature to set ordered quantities for multiple products at once and mark them all as ordered. This is much faster than going product by product.
Export to CSV or XLSX
Need to send an order to your supplier in a specific format? Export your forecasting data as a CSV or XLSX file. This gives you a clean spreadsheet you can forward directly to your vendor or import into your purchasing system.
Bonus: Snooze Products You Can't Restock Yet
Sometimes a product is out of stock or running low, but there's nothing you can do about it right now — maybe the supplier has a component shortage or the product is temporarily unavailable. Instead of seeing it flagged as urgent every time you open the app, you can snooze it.
Set a snooze period (say, two weeks) and the product disappears from your active list until that time is up. When the snooze expires, it comes back so you can check in with your supplier again.
Step 6: Set Up Weekly Email Reports
Once your forecasting is configured, enable weekly email notifications in the settings. You'll get a summary of your inventory status delivered to your inbox every week — which products need reordering, what's running low, and what's well-stocked.
This means you don't even need to open the app to stay on top of your inventory. The report comes to you.
That's It — You're Set Up
The whole process takes about five minutes. After that, the app works continuously in the background, analyzing your sales data and updating its recommendations as new orders come in.
The key is to check in regularly (the weekly email makes this easy) and adjust your settings as you learn more about your products' sales patterns. Over time, you'll develop an intuition for which suppliers have longer lead times, how much safety stock buffer works best for your business, and which sales periods give you the most accurate forecasts.
Ready to Try It?
Set up inventory forecasting on your Shopify store in under 5 minutes.
Start 30 Days Free Trial →